Quick Builds: How to Create a Pop-up in Vev
September 19, 2023
Words by Diego Muralles
What is a Pop-up?
A pop-up, known otherwise as a ‘modal’, ‘modal window’ or ‘lightbox’, is an element that displays in front of other web page content. They can be automatically set to appear, or triggered by users’ clicking, scrolling or hovering. Users must close the pop-up or engage with it in order to return to the content they were looking at.
Pop-ups are designed to grab the attention of a website’s audience. With this in mind, any pop-up you display on your website should be relevant to the visitor and presented creatively, without causing unnecessary annoyance.
Use Cases of a Pop-up
Pop-ups have a number of use cases. To give you some idea as to how you could use pop-ups on your website, we’ve listed a few:
- Cookie consent
- Subscribe to a newsletter
- Sign-up to an event (such as a webinar)
- Navigational pop-ups (start a product tour, for example)
- Informational pop-ups (Inform users of a discount, promotion, event, update, and so on)
- Product recommendations
- Client testimonials
- Social media links (to encourage follows)
- Feedback ratings
How to Create a Pop-up in Vev
Now, let’s dive into this Vev ‘Quick Build’ to create a pop-up in just a few clicks. In this tutorial, you will learn how to create:
- An automatic pop-up
- A click-triggered pop-up
1. Creating an Automatic Pop-up
In this case, we are going to be using Vev’s animation add-on to make the pop-up slide-in on load, and then fade-out on click.
Note that for this tutorial, we are assuming that the user has already designed their pop-up frame.
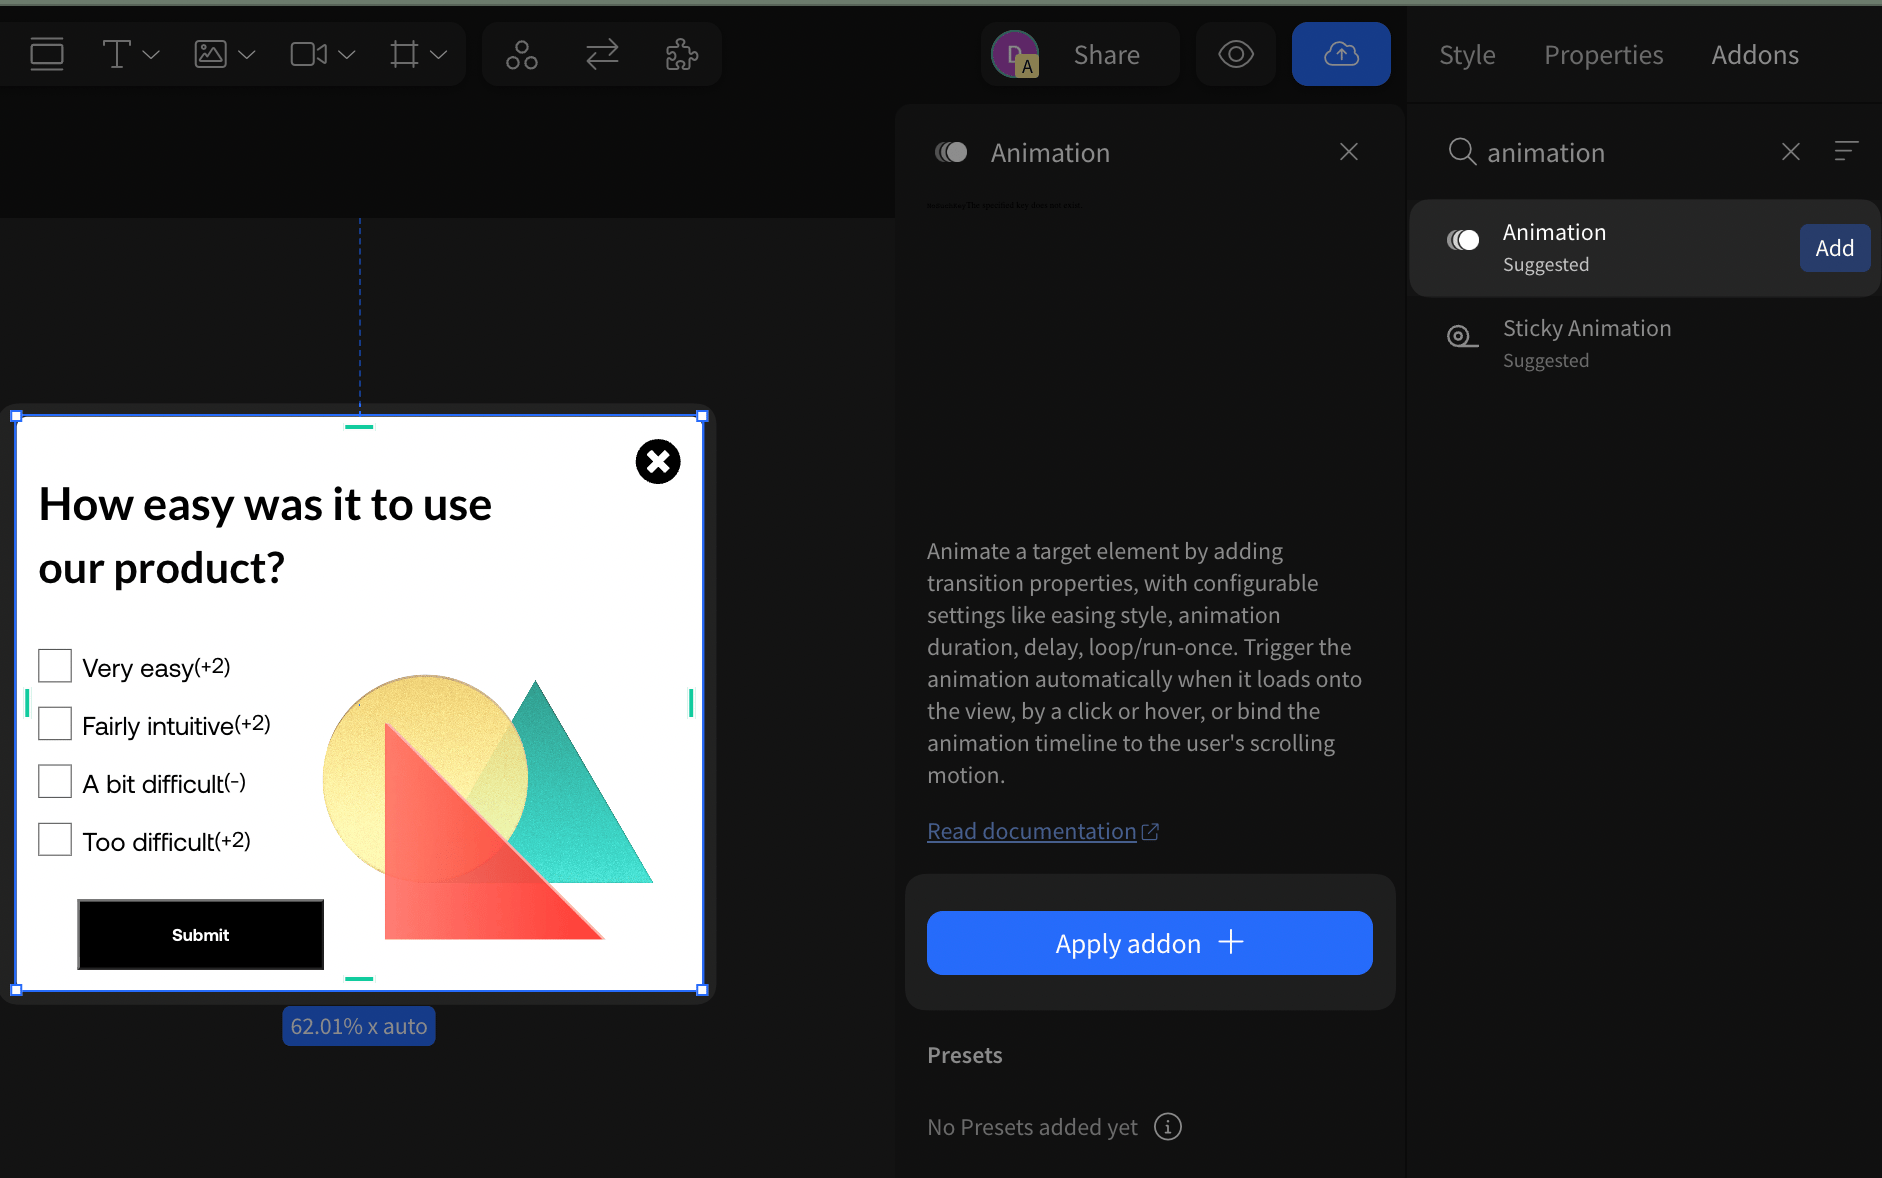
1.1 Attach the animation addon to your pop-up frame
- Select your pop-up frame
- On the right-side panel top, click on ‘’Addons’’
- Search for and select ‘’Animation’’
- Click on the blue button ‘’Apply addon’’
1.2 Set the slide-in animation
- To open the animation settings, click on the animation icon that is next to your pop-up frame in the layers panel (left-side panel)
- Select the ‘’Load animation’’ tab
- Click on ‘’Add animation’’
- Select ‘’Slide in from left’’ from the different options
1.3 Customize animation
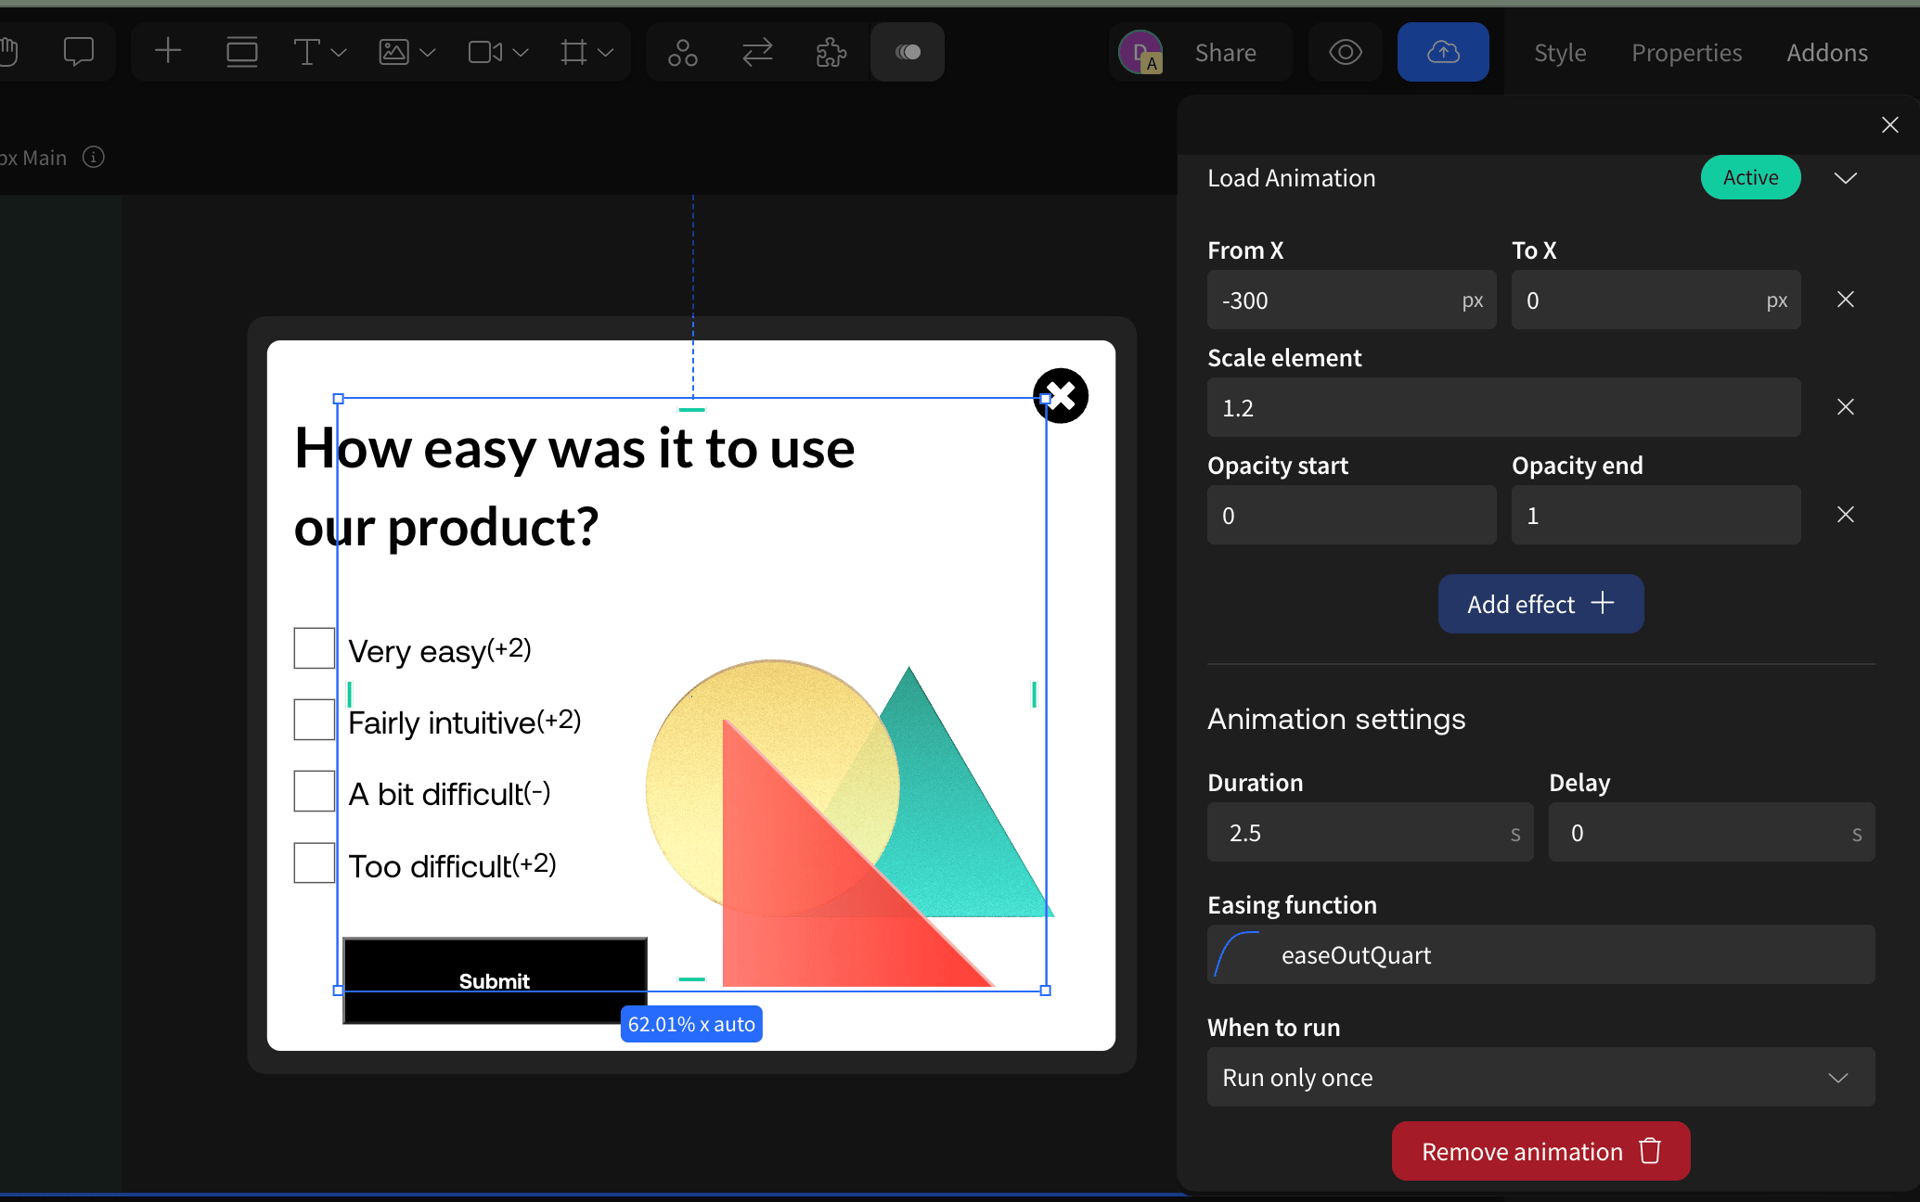
Since ‘’Slide in from left’’ is one of our preset animations, you’ll notice that animation parameters are already defined. In this case, the animation is made up of the opacity and ‘move horizontal’ effects (the position of the element in the x axis). You can tweak the existing parameters — or even add a new effect — to personalize the animation. As an example, I’ll be adding the scale effect to customize the animation a bit more.
To do this:
- Click on ‘’Add effect’’
- Select ‘’Scale’’
- Set it to 1.2
Under ‘’animation settings’’, you’ll be able to set additional parameters such as the duration of the animation, delay, easing function, and when to run. For this use case, it’s important to set the ‘’When to run” parameter to ‘’Run only once’’. You can tweak the rest according to your needs.
1.4 Close pop-up on click
Now it’s time to make the pop-up fade-out on click:
- In the animation settings, select the ‘’Click animation’’ tab
- Select ‘’Opacity’’ from the different options
Note: Notice that this time we aren’t using an animation preset, we are simply selecting an effect 🙂
- Set the ‘’Opacity start’’ parameter to 1
- Set the ‘’Opacity end’’ parameter to 0
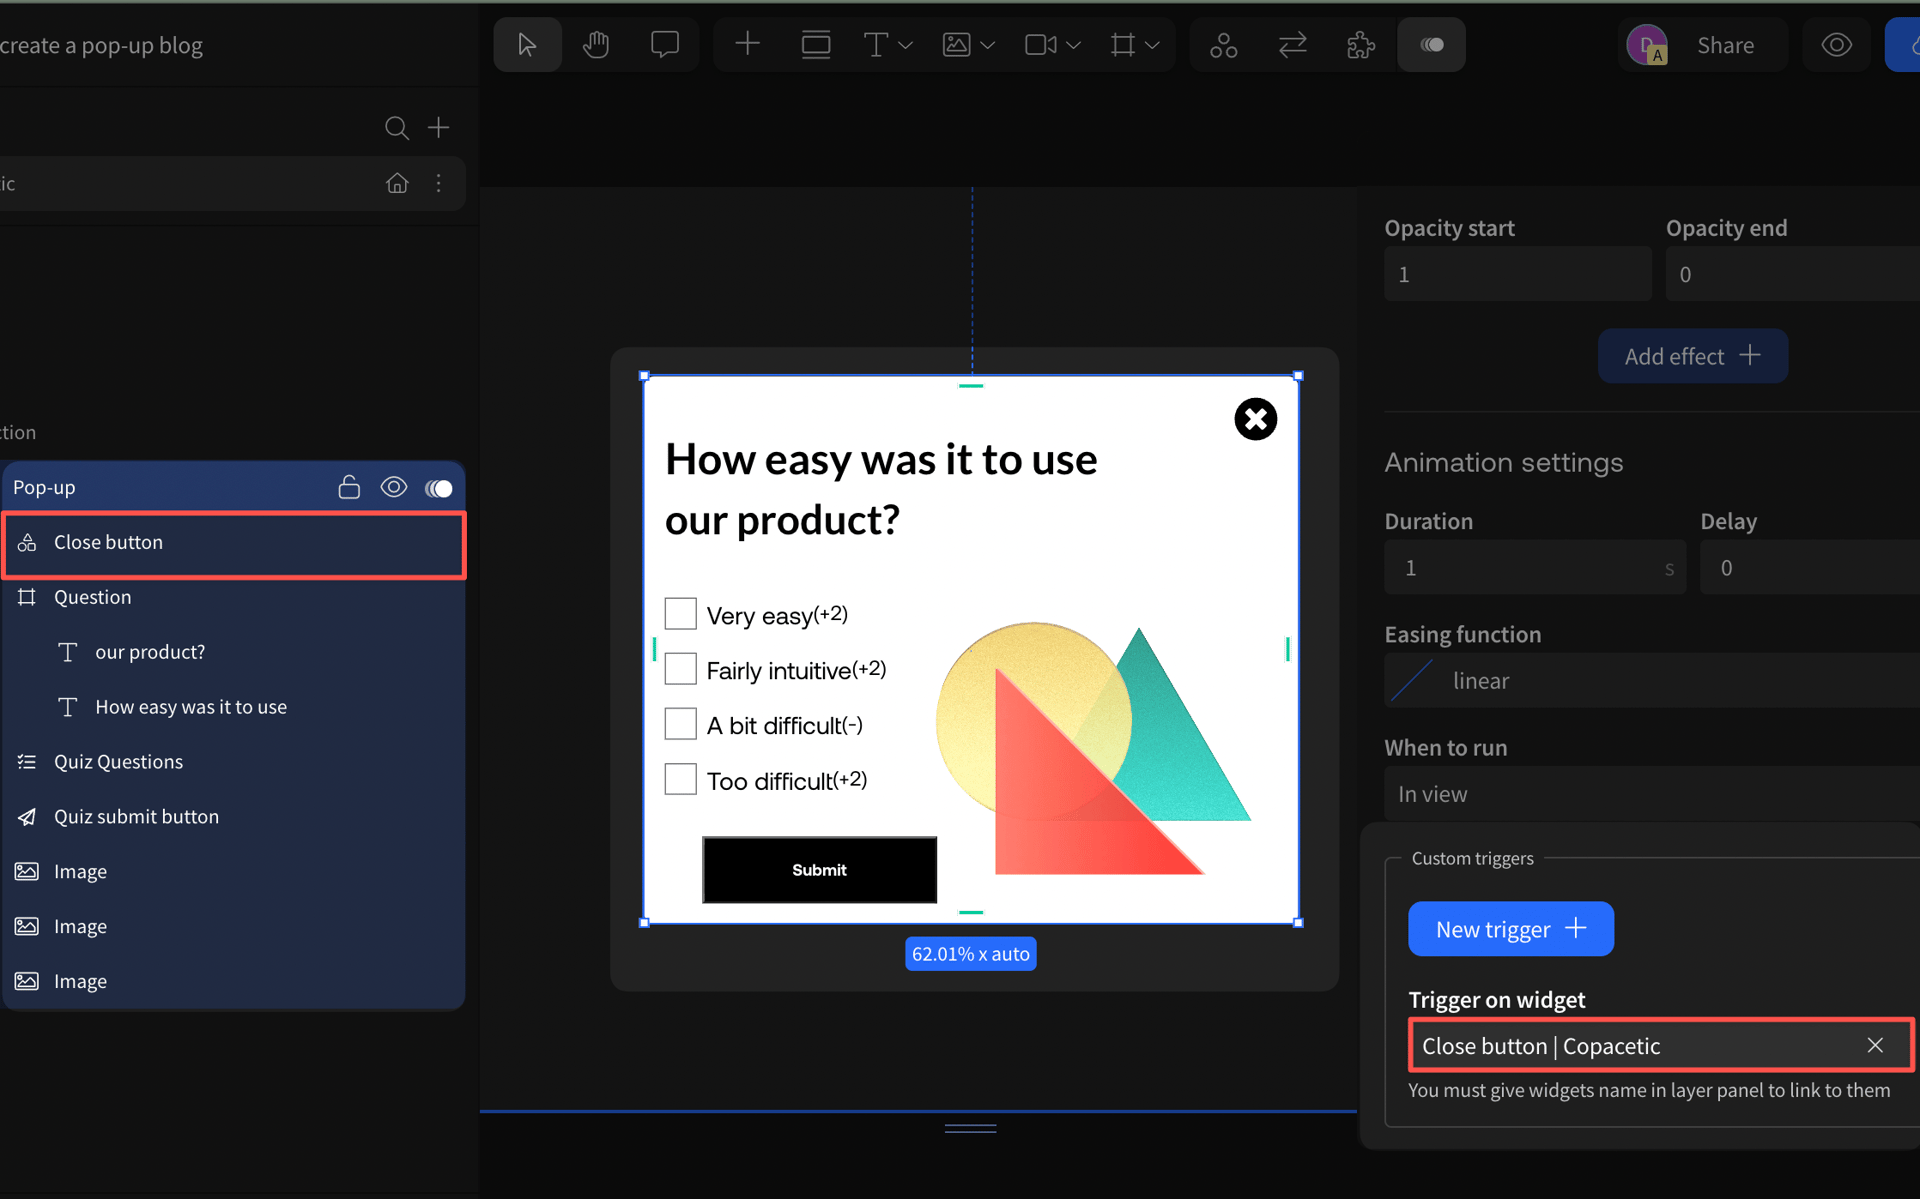
Now, since we want our pop-up to disappear when clicking on a ‘’close’’ button, we need to add this button as the trigger of the fade-out animation. To do this:
- Give a custom name to your close button in the layers panel (left-side panel)
Note: This is a really important step, otherwise, Vev won’t recognize your element and it won’t work as a trigger.
- Go back to the animation settings
- Click on ‘’New trigger’’ at the bottom of the panel
- Find and select your close button in the dropdown list
And that’s it! Your pop-up should appear as your website loads and you should be able to close it by clicking the close button.
2. Creating a Click-Triggered Pop-up
Now we are going to create an interactive map. You can click on each location and a pop-up with a tourist place will appear.
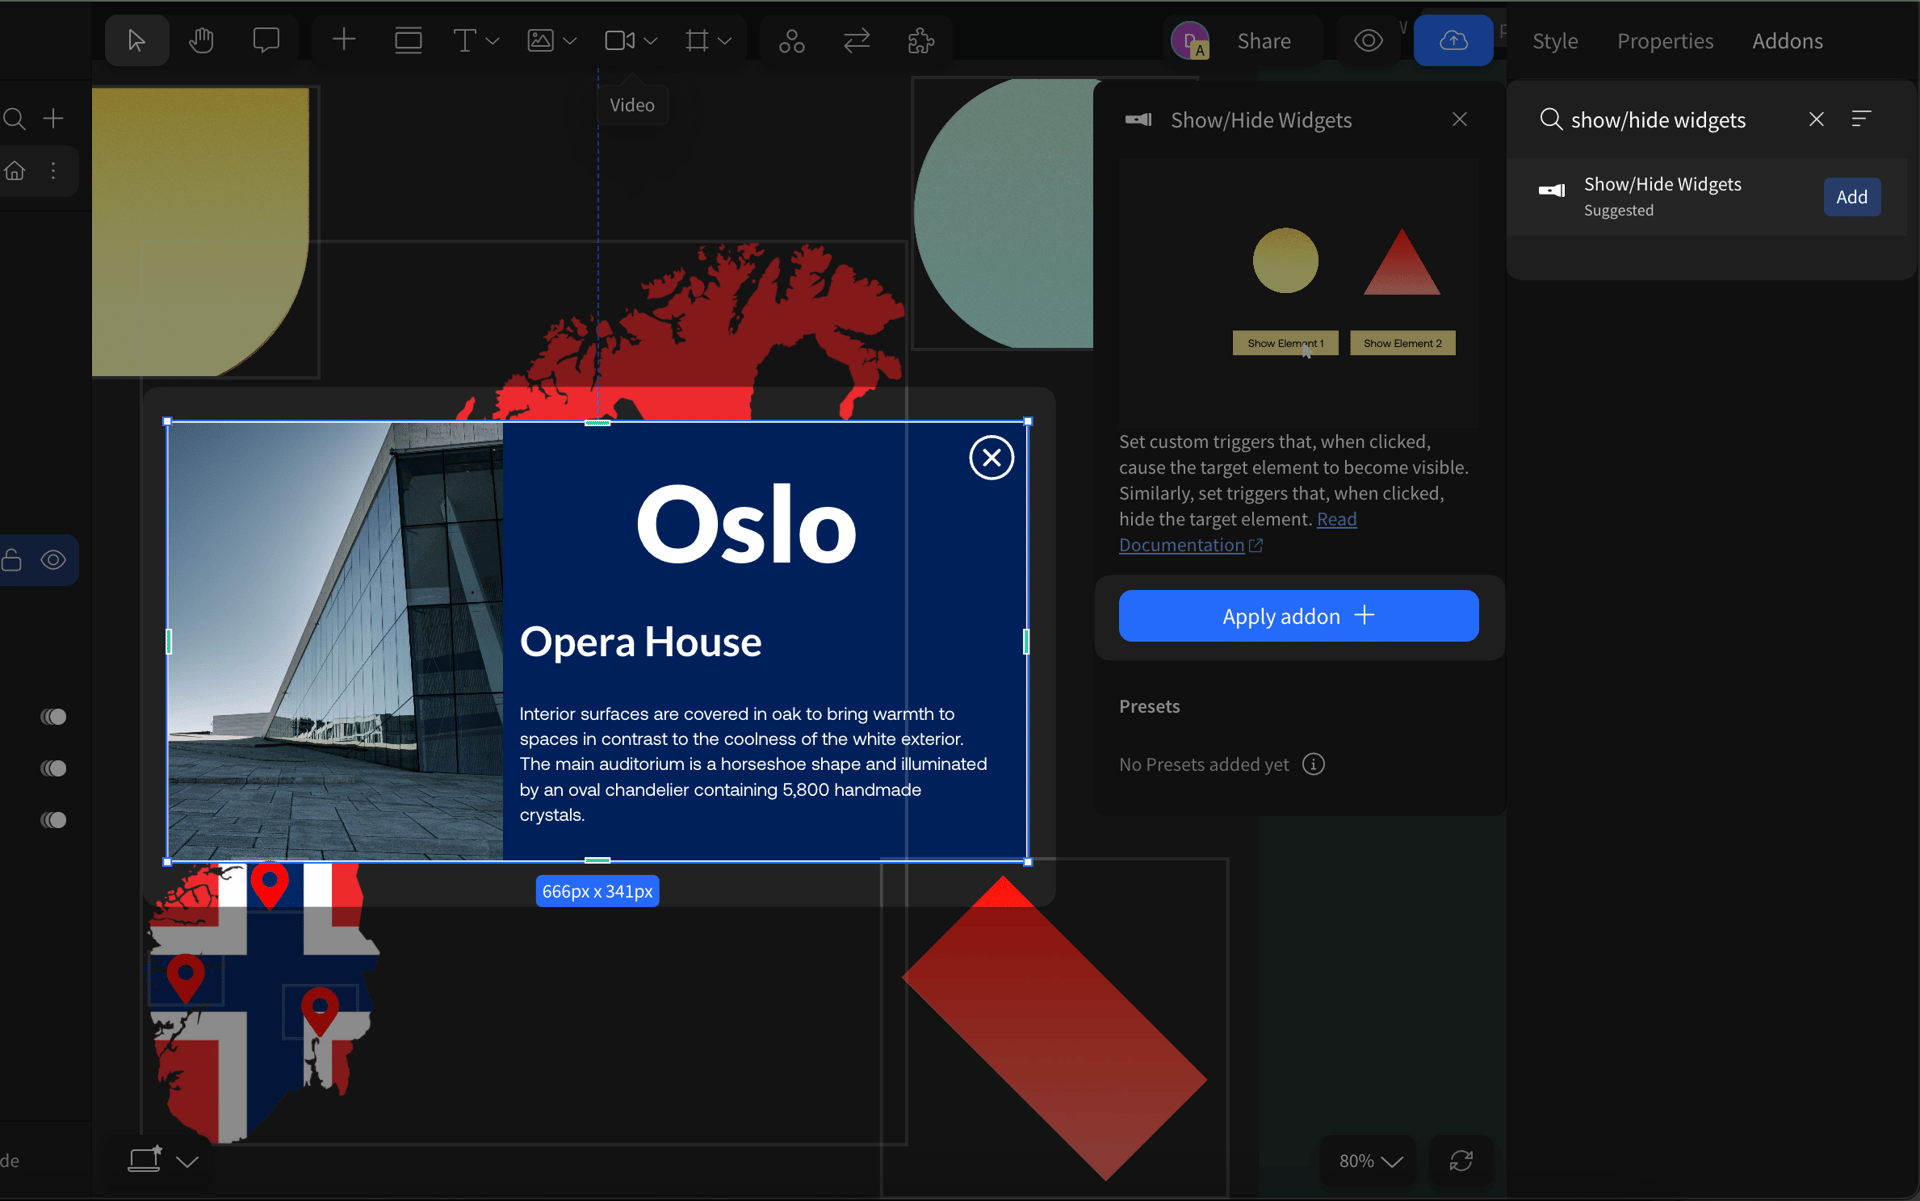
In this case, we are going to use our ‘’Show/hide widget’’ addon since it allows us to set both opening and closing triggers which is perfect for this use case.
2.1 Attach the Show/hide Widget addon to your pop-up frame
- Select your pop-up frame
- On the right-side panel top, click on ‘’Addons’’
- Search for and select ‘’Show/hide Widget’’
- Click on the blue button ‘’Apply addon’’
2.2 Set up the Show/Hide Widgets addon
In the settings, you can set both showing and hiding triggers.
To do this:
- Give a custom name to the elements that are going to be used as triggers in the layers panel (left-side panel)
- Go back to the addon settings
- Click on ‘’Add item’’ and configure your showing and hiding triggers accordingly
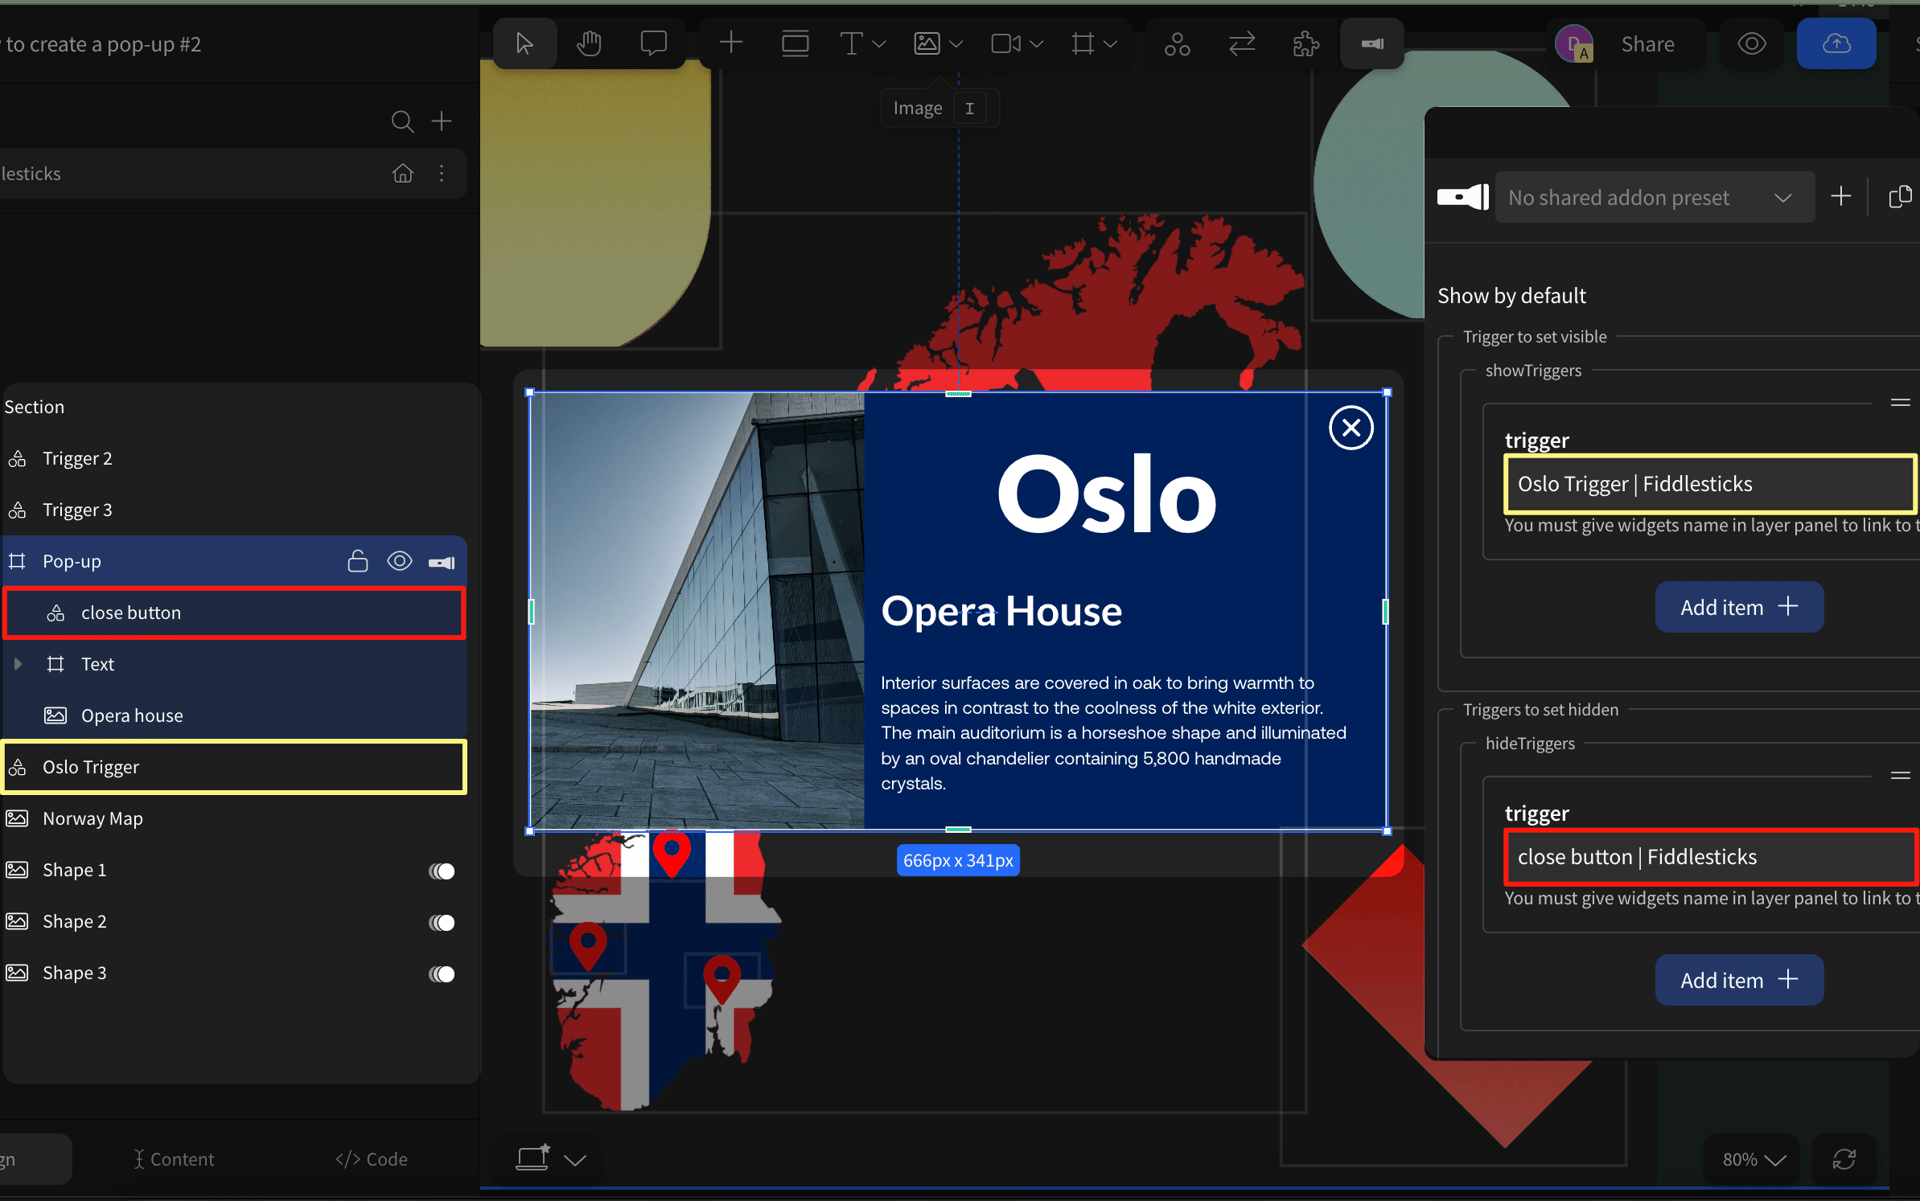
At the top, toggle on the ‘’Show by default’’ option to make your pop-up show up by default when your website loads. You can choose from a number of preset animations that control how your pop-up enters and leaves the users’ view at the bottom of the settings panel.
And that’s it! You should now be able to show/hide your pop-up based on your triggers setup.
Create interactions and animations without code
Whether you want to create pop-ups for sign-ups, or use them as a way to add interactivity to your design and let your audience reveal extra information, Vev gives you the tools to do so! Customize your interactions and animations with a few clicks in our visual no-code editor. When you're done, embed your creation in your existing site anywhere on the web, or host it with Vev.
Want More Inspo?
Get our monthly newsletter straight to your inbox.
You can always unsubscribe at any time.
Privacy Policy
